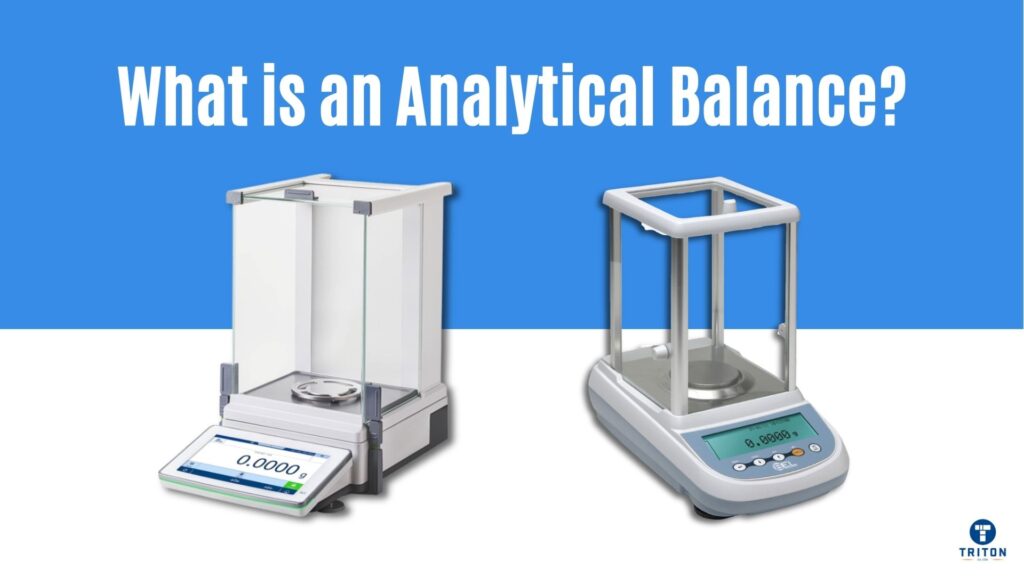
An analytical balance measures sample masses in laboratories with 0.1 mg readability for standard models or 0.01 mg readability for semi-micro versions. Scientists use these instruments in research, chemistry, and quality control, where tiny mass differences determine results. The balances protect against air currents and dust with enclosed weighing chambers. Modern units connect through USB or RS-232 ports for data transfer and accept density kits for specific gravity measurements.
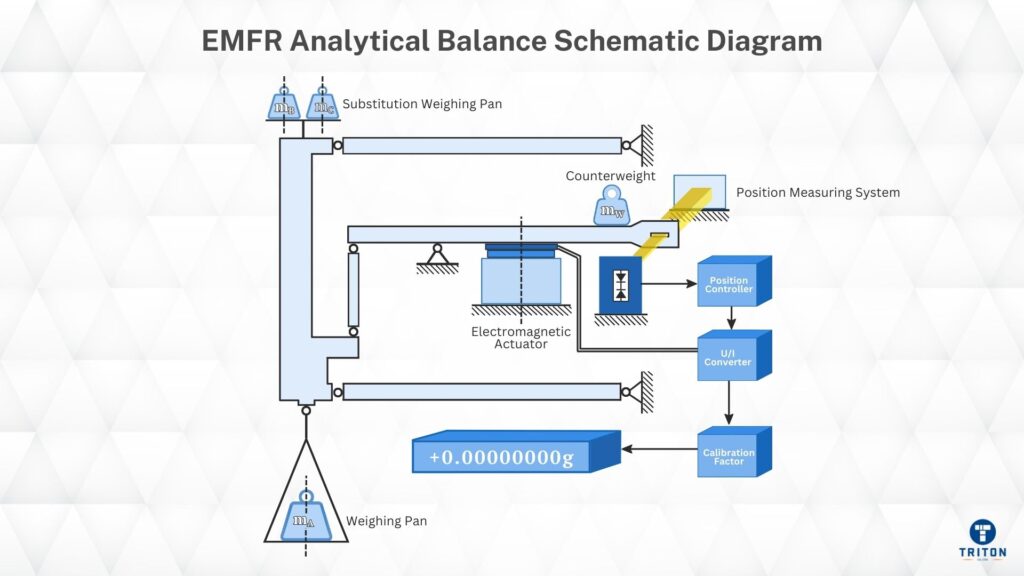
Modern analytical balances operate on the principle of electromagnetic force restoration (EMFR), which is exceptionally precise.
When you place a sample on the pan, its mass creates a downward force which displaces a coil suspended in a magnetic field. An optical sensor detects this minute movement and signals a control circuit to increase the electrical current flowing through the coil, which generates an opposing electromagnetic force, precisely counteracting the sample’s weight and restoring the pan to its original null position.
The amount of current required to achieve the equilibrium is directly proportional to the mass on the pan. The balance’s electronics accurately measure this current and convert it into the digital mass reading.
Don’t Switch Off Your EMFR Analytical BalanceOne of the most important rules for handling a modern analytical balance is never turning it off at the main power switch as part of your daily shutdown routine. Leaving an expensive piece of equipment running might feel strange, but these instruments are designed for it. Why It Needs to Stay On: The “Preheat” RuleThink of your balance like a high-performance oven. You always preheat an oven to a stable, even temperature before baking to get good results. Your balance works on a similar principle called electronic thermal equilibrium. The sensitive internal electronics, especially the EMFR weighing cell, generate a tiny amount of heat. It needs a long time (often over an hour) for this warmth to spread evenly and for the internal temperature to stabilise. If the temperature is still changing, the readings will wander and drift, making them useless. This error is known as thermal drift. By leaving the balance on, you always keep it “preheated” and thermally stable. Use Standby Mode – That’s the Real “Off”The correct way to finish using the balance is to clean it, close the draft shield doors, and walk away. The balance will automatically put its display into a low-power standby or sleep mode. This action turns off the screen but keeps the internal components in thermal equilibrium and ready for use. The Benefits of Leaving It OnFollowing this single rule gives you three significant advantages:
|
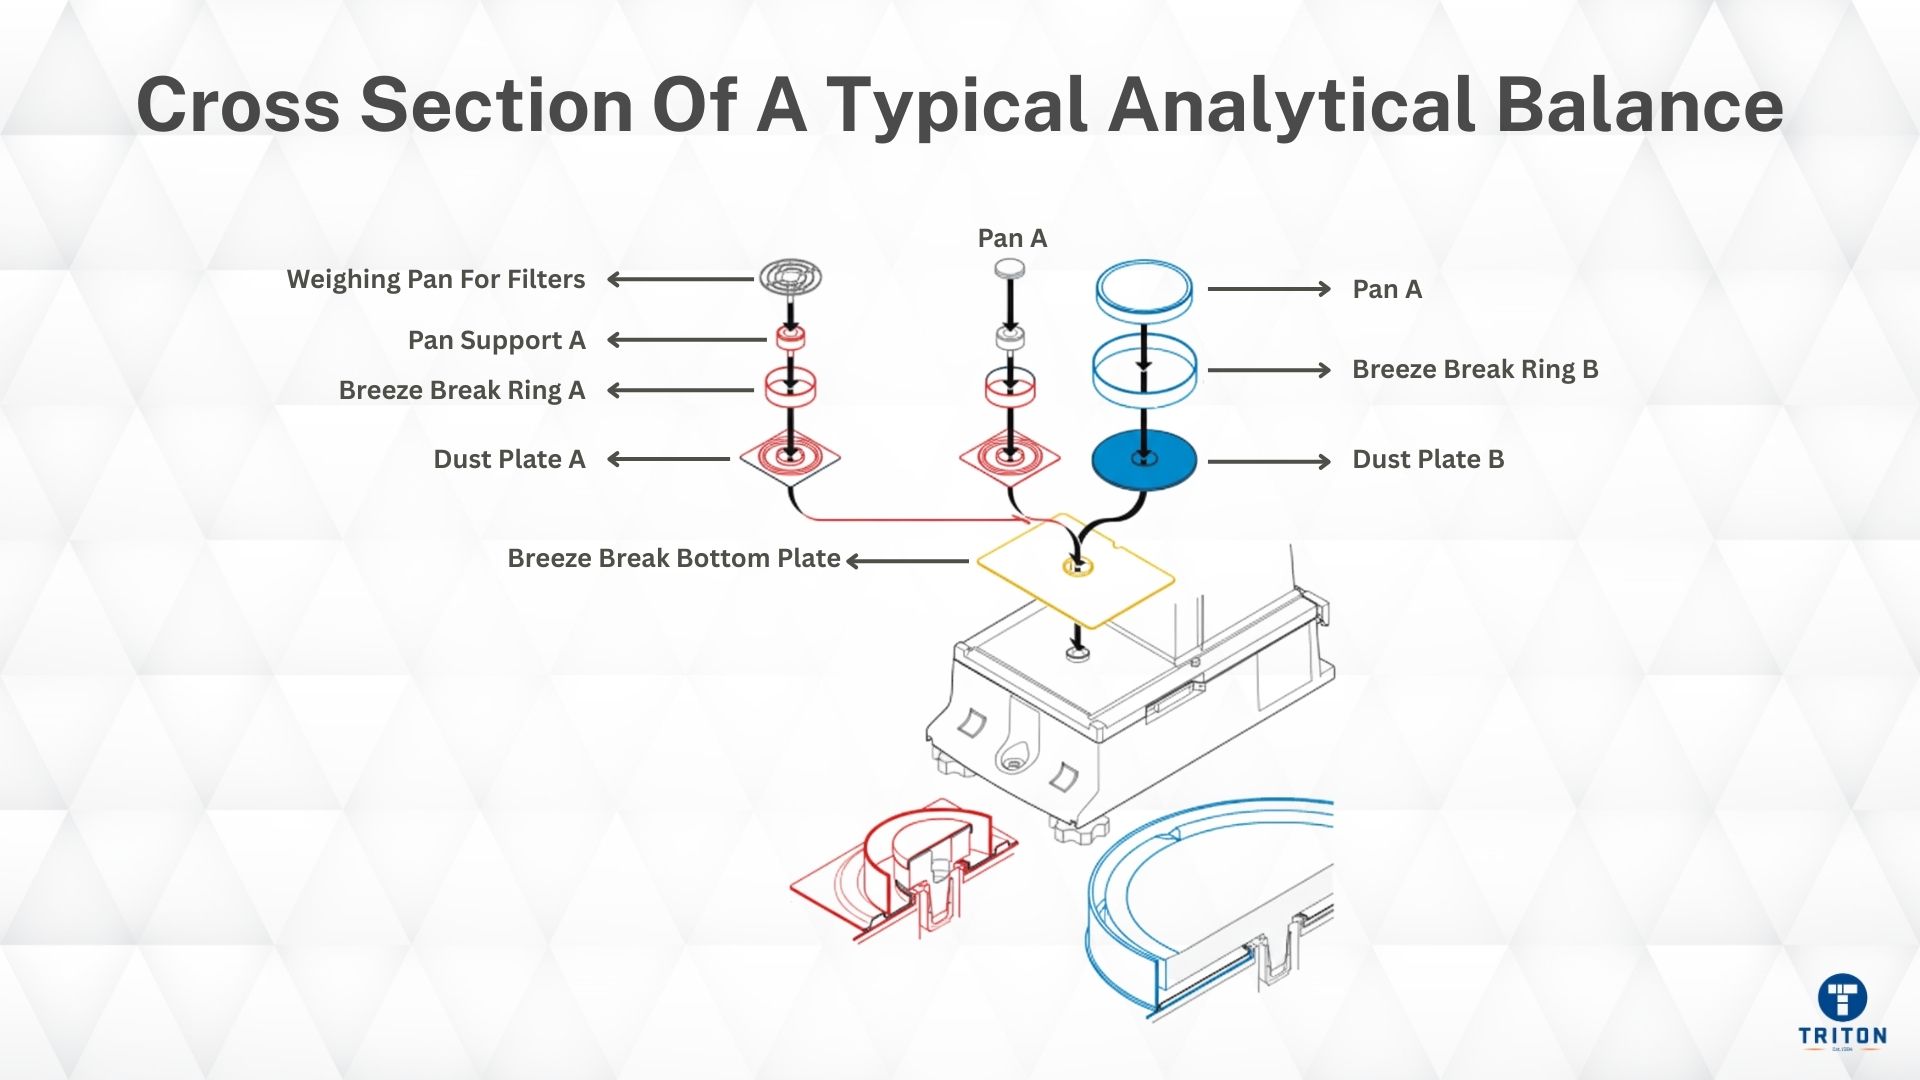
A modern analytical balance combines a highly sensitive internal mechanism with a user-focused external design.
The components can be grouped into three main categories.
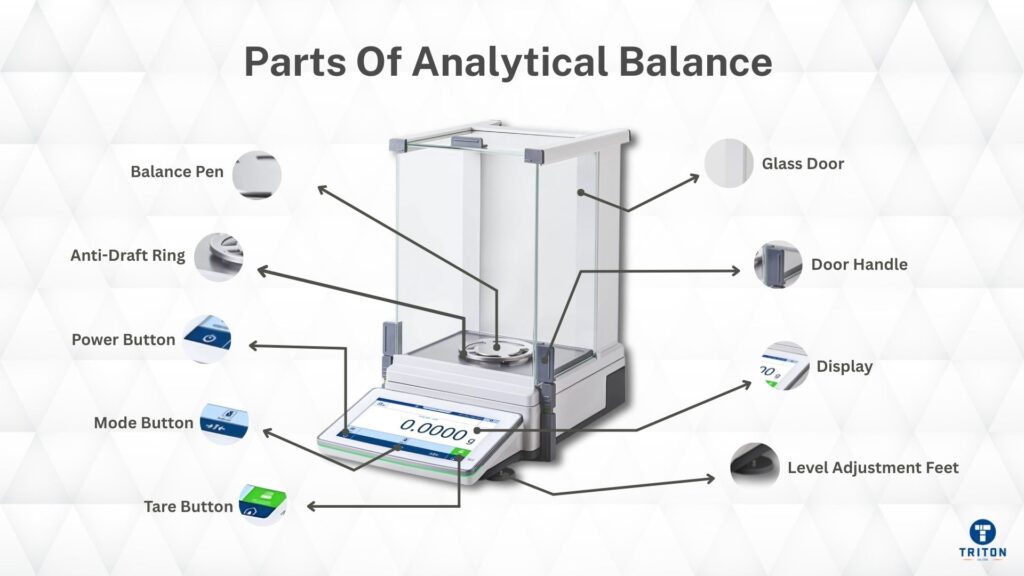
These are the components you see and interact with during daily use.
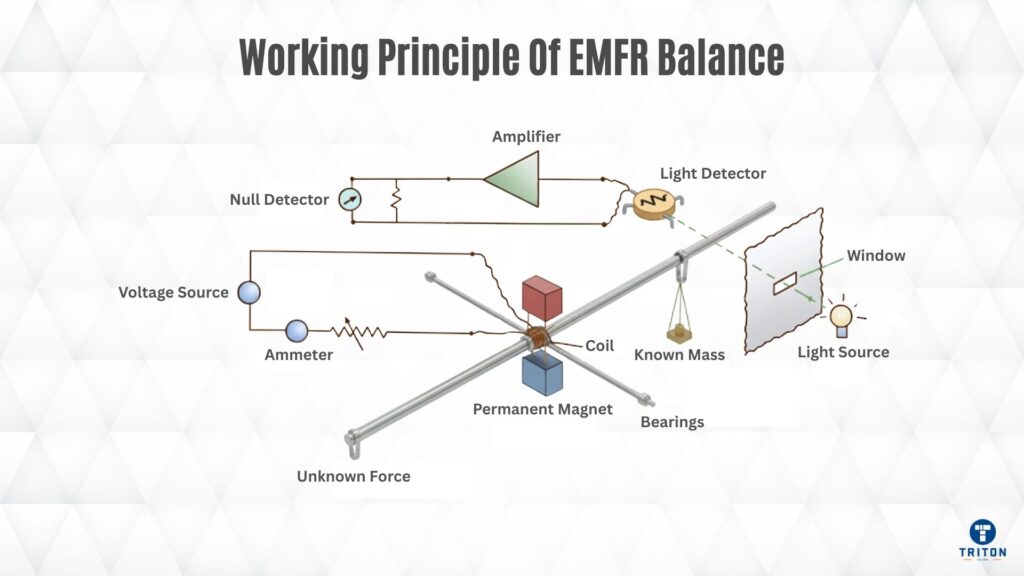
The EMFR system uses a fundamental principle in physics known as the Lorentz Force. This principle states that when a wire carrying an electrical current (I) experiences a force (F) when placed in a magnetic field (B).
The magnitude of the force is directly proportional to the current, the length of the wire (L) within the field, and the strength of the magnetic field. The relationship is described by the formula below:
F = I⋅(L×B)
Simply put, more current equals more force – a linear and repeatable relationship and the key to the balance’s precision.
The EMFR mechanism uses a control system to generate the exact amount of current needed to create a Lorentz force that perfectly counteracts the weight of the sample.
To apply this principle, the mechanism uses the following key parts working together in a high-speed feedback loop:
Here is the sequence of events that happens in a fraction of a second when you place a sample on the pan:
These parts are essential for maintaining accuracy and integrating the balance into a modern workflow.
Following the correct procedure produces accurate results, prevents contamination, and protects the sensitive components.
Before you begin weighing, prepare the instrument and its environment.
Proper cleaning and shutdown protect the instrument for the following user.
Advantages | Disadvantages | Heading #3 |
|---|---|---|
High Precision: They provide extremely precise mass measurements, with a readability typically ranging from 0.1 mg down to 0.01 mg (four to five decimal places in grams). | High Cost: These are precision instruments and are significantly more expensive than standard laboratory or top-pan balances. | |
Excellent Readability: Modern balances have bright, clear digital displays and intuitive user interfaces that are easy to learn and operate. | Environmental Sensitivity: Their accuracy is highly susceptible to disturbances like air currents, vibrations, temperature changes, and static electricity, requiring a controlled environment. | |
Internal Calibration: Many models feature automatic internal calibration systems. These systems use a built-in weight to adjust the balance automatically, ensuring consistent accuracy. | Requires Warm-Up Time: To achieve thermal stability and accurate readings, the balance must be powered on for a significant period (at least 30-60 minutes) before use. | |
Data Traceability: Most analytical balances include data output ports (like USB or RS-232), allowing results to be sent directly to a printer or computer for accurate record-keeping. | Limited Capacity: They are designed for measuring small masses and typically have a low weighing capacity, often between 100 g and 300 g, making them unsuitable for large samples. | |
Quick Stabilisation: Despite their sensitivity, modern EMFR mechanisms allow the reading to stabilise in just a few seconds, which is much faster than older mechanical models. | Regular Maintenance: They require routine cleaning and professional servicing and calibration to maintain their high level of performance and accuracy over time. |
Clean your analytical balance regularly to prevent spilt materials from corroding components or interfering with measurements.
Power off the device and empty the pan. Press the ‘Tare’ or ‘Zero’ button to clear the display. Taring sends the balance to a stable, inactive state for cleaning.
Carefully lift out the weighing pan, the pan support (the sub-pan or drip tray underneath), and the removable draft shield panels and base plate. These parts are designed to be easily removed by the user.
Using a soft “balance brush”, gently sweep the spilt sample from the removed parts and inside the weighing chamber. Always brush debris away from the centre hole of the balance to prevent particles from falling into the internal mechanism.
Dampen a lint-free cloth with a suitable cleaning solution, such as 70% ethanol, isopropanol, or a mild, neutral-pH detergent. The fabric must be damp, not wet, to prevent liquid from dripping into the balance housing. Gently wipe down the pan, pan support, draft shield panels, and the interior and exterior surfaces of the balance.
Wipe every component using a new, dry, lint-free cloth to ensure they are completely dry. Once you’re certain there is no moisture, carefully reassemble the draft shield, pan support, and weighing pan in the reverse order you removed them.
Press the ‘Zero’ button to tare the clean, fully assembled balance. Place a known, certified weight on the pan to confirm that the cleaning process hasn’t disturbed its accuracy. Verify that the reading is correct before resuming regular use.
Here’s a step-by-step guide based on both internal and external calibration methods:
Level and Warm Up: Ensure the balance is accurately levelled using its bubble indicator and adjustable feet. The balance must be powered on to reach thermal stability, which requires at least 30-60 minutes.
Internal calibration is convenient and reduces handling errors. External calibration is essential for balances without an internal system or specific validation protocols requiring traceable, certified weights.
Here are the key factors that affect the performance of an analytical balance.
Feature | Analytical Balance | Precision (Top-Loading) Balance | Spring Balance |
|---|---|---|---|
Readability | Very High: 0.01 mg to 0.1 mg (0.00001 g to 0.0001 g). Required for quantitative analysis. | High: 1 mg to 1 g (0.001 g to 1 g). Used for general laboratory weighing. | Low: Measures by spring deformation. Not suitable for any scientific precision work.
|
Typical Capacity | Low: Typically 50 g to 500 g. | Medium: Typically 200 g to 8 kg. Not suitable for extremely heavy loads. | Variable: Can be designed for very high capacities, sacrificing all precision. |
Weighing Mechanism | Electromagnetic Force Restoration (EMFR). | Electromagnetic Force Restoration (EMFR) or similar electronic load cell. | Hooke’s Law (force on a spring). Measures weight, not mass. |
Key Features | Required Draft Shield to protect from air currents. Often has internal, automatic calibration. | Open weighing pan. Higher readability models (1 mg) often include a simple draft shield. | Simple hook and a manually read scale. No electronic features. |
Environmental Sensitivity | Extremely Sensitive to temperature, air, vibrations, and static. Requires a controlled environment and anti-vibration table. | Moderately sensitive. Requires a stable, level surface but is more robust than an analytical balance. | Low sensitivity to drafts, but is affected by temperature (changes spring elasticity) and variations in local gravity. |
Primary Application | Chemical analysis, pharmaceutical research, density determination, pipette calibration. | Sample preparation, quality control, formulation, general lab work. | Classroom demonstrations, weighing luggage, non-critical field measurements. |
The environment, setup, and the discipline & skill of the operator affect the performance of an EMFR analytical balance. The instrument’s high cost and extreme sensitivity are not drawbacks, they are necessary for the precision required in quantitative science.
To ensure your facility is equipped with an instrument capable of meeting these exacting standards, explore the professional range of weight measurement solutions at the Triton Store.


Melbourne
Brisbane
Phone 1300 558 438
Live Chat – Widget below
Melbourne
Brisbane
Phone 1300 558 438
Live Chat – Widget below