How to Make Shipping Labels –  Your Ultimate Guide!

How to make a shipping label

Share This Post

Creating accurate shipping labels is a fundamental yet often understated aspect of successful logistics and e-commerce operations. Far more than just adhesive identifiers, these shipping labels play a crucial role in the logistics chain, influencing both the efficiency of deliveries and overall customer satisfaction.

This article offers a comprehensive, structured guide to the process of creating shipping labels. To make things easier for you, we have divided this article into three sections, each of which focuses on a different method for creating shipping labels.

The first section addresses label creation through specialised software solutions. Following this, the second section provides an in-depth look at utilising carrier platforms, including FedEx, UPS, and USPS. The final section focuses on using e-commerce platforms such as PayPal, Shopify, eBay, Etsy, and Facebook Marketplace.

Before exploring shipping label creation, we recommend reading our dedicated guide, What is a Shipping Label? This resource provides a comprehensive overview of what constitutes a shipping label, detailing its structure and the essential information it contains. This foundational knowledge will significantly enhance your understanding of the label creation process, allowing you to effectively navigate the various options outlined in this guide.  

With this context in mind, let’s embark on the journey of creating a shipping label.

How to Make a Shipping Label Via Software?

Creating shipping labels via software is a streamlined and efficient approach suitable for businesses of all sizes. These tools streamline the label creation process, significantly reducing the time and effort required compared to manual methods.

By offering customisation options, the software enables businesses to tailor labels to their specific needs, whether it’s adding brand logos or specific handling instructions. One of the most significant advantages of using software is its automation and integration capabilities with various logistics systems, ensuring a seamless flow of information and coordination. 

These software solutions are also designed for accuracy and efficiency, crucial in handling high volumes of shipments. 

Key Features to Look for in Shipping Label Software

Eleven key features to look for in Shipping label software

When selecting software for creating shipping labels, consider the following essential features. 

  • User-Friendly Interface: Ensures ease of use with clear navigation and intuitive design.
  • Carrier Integration: Offers compatibility with a wide range of shipping carriers and services.
  • Batch Processing: Allows for processing multiple labels simultaneously, saving time for bulk shipments.
  • Shipping Label Template with Customisation Options: Provides the ability to personalise labels with logos, specific instructions, or branding elements.
  • Real-Time Tracking: Enables the tracking and monitoring of shipments directly from the software.
  • Automated Updates: Keeps the system up-to-date with the latest carrier rates, services, and regulations.
  • Support and Documentation: Ensures access to customer support and comprehensive documentation for troubleshooting and guidance.
  • Automation Capabilities: Facilitates automatic filling of shipping details, reducing manual data entry, and minimising errors.
  • Database Integration: Seamlessly integrates with existing databases or CRM systems for efficient data retrieval and management.
  • Scalability: Adapts to growing business needs, accommodating increased volume without compromising performance.
  • Reporting and Analytics: Provides insights into shipping trends, costs, and operational efficiency.

Step-by-Step Process for Creating a Shipping Label

Please note that the below is a generic guide, as different software solutions may have varied interfaces and functionalities. The goal here is to provide a foundational understanding that is applicable to most software options. 

  1. Gather Required Information: Collect all necessary details, such as sender and receiver addresses, package dimensions, and weight.
  2. Choose a Shipping Carrier and Service: Select a carrier based on factors like delivery speed, cost, and destination. Decide on the service type (e.g., standard, express).
  3. Input Shipment Details: Enter the collected information into the software. This typically includes recipient information, package size, weight, and preferred shipping options.
  4. Customise the Label (if applicable): Add any custom details like business logos, specific handling instructions, or promotional messages.
  5. Review and Confirm: Double-check all entered details for accuracy.
  6. Print the Label: Use a suitable printer to print the label. Ensure the print quality is high enough that all details, especially barcodes, are clear and scannable.

Make Shipping Label Creation Easy With BarTender Software!

Make shipping label creation easy with BarTender software

In the realm of shipping label software, one exceptional choice we at Triton Store recommend is Seagull Scientific’s BarTender Software

Known for its versatility and professional-grade label design capabilities, BarTender stands out with its extensive range of specialised shipping label templates, catering to various specific needs. Its prowess in barcode generation, with over 400 preformatted components and support for numerous barcode standards, makes it an ideal choice for businesses seeking precision and variety in their labelling processes.

At Triton Store, we understand that different organisations have unique requirements. That’s why we offer all four editions of BarTender software – Starter Edition for smaller teams, Professional Edition for more complex labelling needs, Automation Edition for seamless automation and integration into business operations, and the comprehensive Enterprise Edition for large-scale organisations. Moreover, for those seeking the latest in remote label printing and design management, we provide BarTender Cloud.

Whether your business is just starting out or scaling up, BarTender software provides the customisation, scalability, and automation capabilities needed to streamline your labelling process. 

To explore how BarTender Software can transform your label printing experience and for a detailed comparison of its Cloud and traditional versions, visit the following guides on our website. 

For any enquiries or to understand more about BarTender’s capabilities, feel free to reach out to us through our live chat or by filling out a form on our site.

How to Generate a Shipping Label from Carrier's Platforms and Online Shipping Services

This section offers straightforward, step-by-step guides on creating shipping labels using three of the major carriers: FedEx, UPS, and USPS.

How to Create a Shipping Label on FedEx?

Five steps to create a shipping label on Fedex

FedEx offers a convenient way to create shipping labels from their website, featuring the FedEx Ship Manager tool. This user-friendly platform enables you to easily generate printable shipping labels from your computer.

Here’s a step-by-step guide to help you create FedEx shipping labels. 

Creating or Accessing Your FedEx Account

  • Account Options: When you visit the FedEx website to ship a package, you have two main options: FedEx Ship Manager and FedEx Ship Manager Lite.
    • FedEx Ship Manager: Best suited for complex shipping requirements, including multi-piece shipments or those needing advanced features like freight, alcohol, or dangerous goods shipping. An account login is necessary for this option.
    • FedEx Ship Manager Lite: Perfect for basic shipments involving a single envelope or package, either within the U.S. or internationally. This user-friendly option does not require a login, allowing you to proceed as a guest.

Entering Your Shipment Details

  • Shipment Information: After choosing the appropriate shipping manager, fill in the required details like the recipient’s address, your return address, package weight, and dimensions.
  • Selecting a Service: FedEx offers a range of shipping services tailored to various needs. Choose one based on your package’s size, weight, and delivery urgency.

Processing Payment and Printing Your Label

  • Completing Your Shipment: Review your shipment details and then head to the payment section. Once the shipping costs are paid, your shipping label is ready to be printed. 
  • Label Printing Options: Print your shipping label using a standard printer at home or in the office. If printing is not feasible for you, FedEx offers printing services at their locations.

How to Create a Shipping Label on UPS?

List of five steps to create a shipping label on UPS

UPS allows you to conveniently create shipping labels directly from their website. Follow these simple steps to create UPS shipping labels.

Getting Started on the UPS Website

  • Accessing UPS Services: Begin by visiting the UPS website and navigating to the “Log in / sign up” section to access your account. If you’re new to UPS, you’ll need to sign up and follow the account registration process.
  • Creating a Shipment: Once logged in, head to the “Shipping” tab and select “Create a Shipment.”

Entering Shipment Details

  • Filling Out Shipment Information: Provide all necessary details for your shipment, including origin and destination addresses, item details, weight, and package dimensions, and select any additional services like insurance, if needed.
  • Selecting Shipping Service: Choose the appropriate UPS shipping service based on your package’s size, weight, and required delivery speed.

Finalising Your Label

  • Payment and Label Generation: After entering all relevant information, proceed to payment. Review your package’s details and complete the payment. Once the payment is processed, UPS will automatically generate your shipping label. 
  • Printing Options: Print the shipping label using a standard printer at home or in the office. If you don’t have access to a printer, UPS provides alternative solutions such as printing at a UPS location and printing via the UPS Store. 

How to Create a Shipping Label on USPS?

Six steps to create a shipping label on USPS

USPS shipping labels can be created through the USPS website. Here’s a step-by-step guide to help you create USPS shipping labels. 

Get Started on the USPS Website

  • Access the Service: Visit the USPS website and use the “Click-N-Ship” feature available under the “Quick Tools” section. This online tool is designed to simplify your shipping process.
  • Create or Access Your Account: If you’re a first-time user, create a USPS account for free. For returning users, simply log in. Your account enables you to manage shipments, track packages, and access cost-saving features.

Enter Your Shipment Details

  • Fill in Necessary Information: On the Click-N-Ship page, input all the vital details of your shipment. This includes both the sending and receiving addresses, the type of item you’re shipping, its weight, dimensions, and the planned shipping date.
  • Select Your Preferred Shipping Service: USPS offers various service options like Ground Advantage, Priority Mail, or Priority Mail Express. Based on your package’s size and delivery urgency, select the most suitable service. You can consider optional extras like insurance for added security. Remember, these services will cost extra. 

Finalise and Print Your Label

  • Review and Pay: After filling in the details, review your shipment information. Proceed to the billing section and complete your payment. This step finalises your postage purchase. Once done, your USPS shipping label will be created. 
  • Print at Home or Office: You can print your shipping label using a standard printer. If you don’t have a printer, USPS offers alternatives such as printing at a local Post Office or using their Label Broker service.

How to Create Shipping Labels From E-commerce Platforms?

Creating shipping labels through e-commerce platforms is a vital process for online businesses and sellers. This section will guide you through the methods to generate shipping labels from Paypal, eBay, Etsy and Facebook marketplace.  

How to Create a Shipping Label on PayPal?

Five steps to create a shipping label on Paypal

PayPal offers a convenient way for users to create and print shipping labels directly from their transaction pages. This feature simplifies the process for PayPal sellers who need to ship products to their customers.

Step-by-Step Guide for PayPal Shipping Labels

  • Access the Transaction: Log in to your PayPal account and go to the “Activity” tab. Find the transaction for which you need a shipping label.
  • Choose to Create a Label: Select the option to create a shipping label associated with the specific transaction.
  • Input Shipping Details: Fill in the necessary information, such as package type, weight, dimensions, delivery confirmation, and insured value (optional) and select the desired shipping carrier and service.
  • Review and Pay: Ensure all details are correct. The shipping cost will be calculated; you can then proceed to pay for the label using your PayPal balance or another linked payment method.
  • Print Your Label: Once the payment is confirmed, the shipping label will be created. You can now print the shipping label. Ensure your printer is set up correctly and you have the proper label or paper type.

How to Create a Shipping Label on eBay?

Seven steps to create a shipping label on eBay

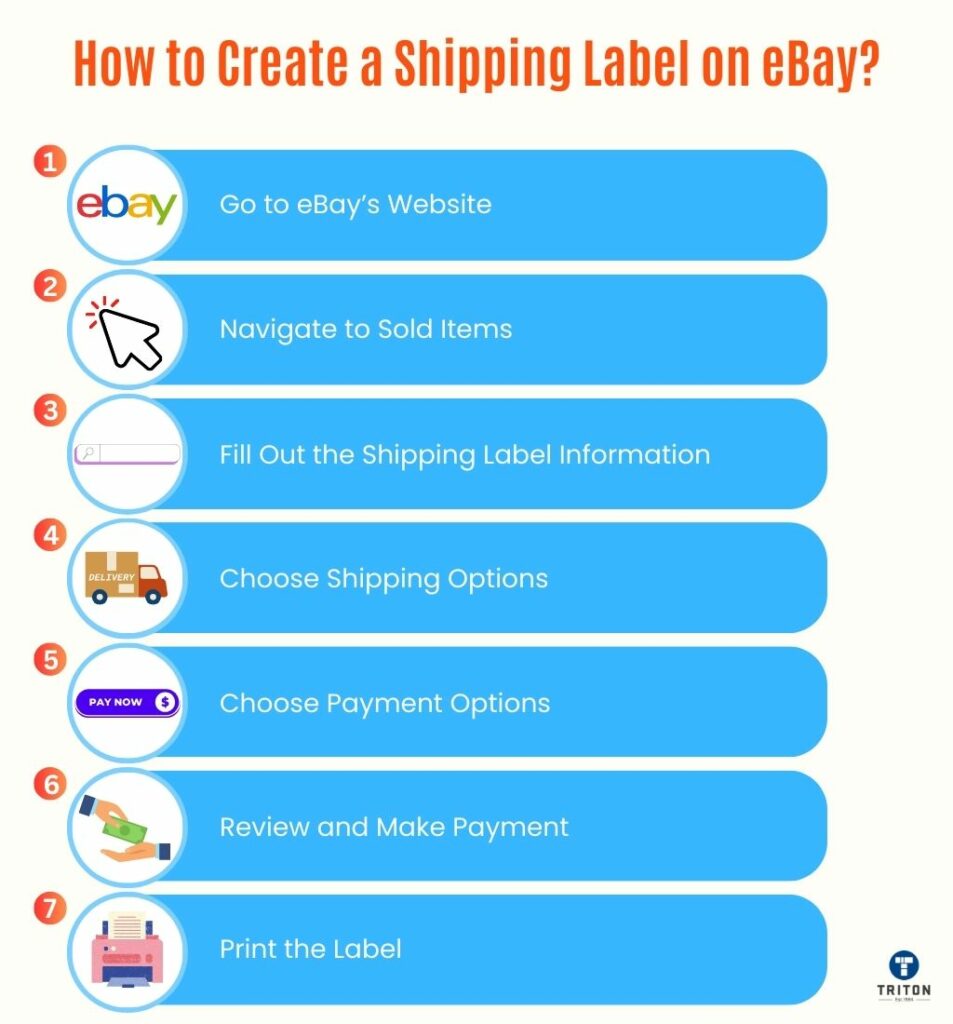
eBay provides a streamlined process for sellers to create and print shipping labels directly from their accounts, accommodating carriers like FedEx, UPS, or USPS. Here’s a step-by-step guide to help you with this process.

  • Access eBay: Open your web browser and navigate to eBay’s website. Log in to your account.
  • Navigate to Sold Items: Hover over the “My eBay” link at the top right corner and click on “Selling.” Then, hover over “Listings” and select “Sold.”
  • Select Item for Shipping: In the “Sold” listings, find the item you need to ship and choose the option to ‘Purchase shipping label.’
  • Enter Label Details: Carefully fill out the shipping label information. Ensure that the package weight and dimensions are accurately entered, rounding up to the nearest whole number. Double-check that all addresses are correct. If shipping hazardous materials, specify the type from the provided drop-down list.
  • Choose Shipping Options: Select a mailing date and your preferred shipping service. You can also add extra options, such as requiring a signature on delivery, additional liability coverage, displaying postage value on the label, customising label text, or including a message in the despatch confirmation email. Note that additional fees may apply for these extra services.
  • Payment and Invoicing: Shipping costs are typically invoiced through your eBay account for services like FedEx Ground, UPS, or if you schedule a pickup. For USPS shipments, a linked PayPal account is required, from which fees are automatically deducted upon transaction processing.
  • Review and Purchase: Review the total shipping costs, then confirm and purchase your shipping label.
  • Print Your Label: After payment, the shipping label is generated and ready for printing. 

How to Create a Shipping Label on Etsy?

Seven steps to create a shipping label on Etsy

Etsy supports a variety of carriers, including Australia Post, Canada Post, FedEx, Global Postal Shipping, UPS®, USPS, Royal Mail, and Evri. This flexibility allows Etsy sellers to choose the best shipping option for their needs, ensuring efficient delivery to customers worldwide. The following guide details the steps to generate shipping labels within Etsy’s platform, catering to a range of delivery services and addressing both domestic and international shipping requirements. 

  • Starting the Process: Log into your Etsy account and navigate to the ‘Shop Manager’. Then, proceed to the ‘Orders & Shipping’ section.
  • Selecting the Order: Identify the order for which you require a shipping label and click on the van icon to initiate the label purchase.
  • Verify Addresses: Confirm the accuracy of both your address and the buyer’s. Edit if necessary.
  • Input Shipping Details: Complete the shipping information, which includes:
    • Package Weight: Enter the total weight.
    • Package Type: Choose based on how you’ve packaged the order.
    • Dimensions: Provide the length, width, and height of the package.
    • Delivery Service: Select a service that balances shipping speed and cost.
  • International Shipping: If applicable, complete the customs form for international orders.
  • Review and Customise: Before purchasing, review the summary of your order. Customise your label download preferences if needed.
  • Purchase the Label: Finalise the process by selecting ‘Purchase’.
  • Label Generation: After purchasing, your shipping label is created and ready for printing.

How to Create a Shipping Label on Facebook Marketplace?

Five steps to create a shipping label on facebook marketplace

Facebook Marketplace simplifies shipping by enabling sellers to create and buy USPS or UPS delivery labels directly through Commerce Manager. Here’s how to do it.

  • Access Commerce Manager: Go to Commerce Manager and select your shop.
  • Navigate to Orders: Click on ‘Orders’ and then ‘Waiting to be dispatched’.
  • Create Label: Find the order you need to fulfil and select ‘Create delivery label’. Note that if the order’s price is lower than the label’s cost, you’ll need to handle despatch manually.
  • Choose Delivery Options: Select options like the fulfilment centre, delivery type, and package weight. For packages over 5 lbs, specify the exact size and weight for accurate pricing.
  • Purchase and Print Label: After selecting your options, click ‘Buy delivery label’. You can print the label immediately or reprint it later by going to ‘Completed’ orders and selecting ‘Reprint delivery label’.

Is it Cheaper to Make Your Own Shipping Label?

When it comes to shipping, one of the key considerations for businesses and individuals alike is cost-efficiency. A significant aspect of this is the creation of shipping labels. The question arises: is it cheaper to make your own shipping label? The answer is multifaceted and depends on several factors.

Cost Comparison

Firstly, let’s consider the direct costs. When you create your own shipping labels, you typically pay for the postage online and print the label yourself. This method can often be cheaper than purchasing labels at a post office or through a courier service. 

Many carriers offer discounts for labels purchased online, as it reduces their administrative workload. For instance, services like USPS, FedEx, and UPS often provide lower rates for online purchases compared to in-store.

Time and Resources

However, cost isn’t just about the money spent on postage. When making your own labels, you need to consider the resources involved. This includes the cost of a printer, ink, label paper, and the time it takes to design and print the label. 

For small-scale shippers, this might not be significant, but for businesses shipping large volumes, the time and resource costs can add up.

Bulk Shipping Discounts

For businesses, another aspect to consider is bulk shipping discounts. If you’re shipping in large quantities, carriers might offer special rates, which might include the cost of labels. In such cases, it might be more cost-effective to use the carrier’s labelling services.

Convenience and Efficiency

There’s also the convenience factor. Printing your own labels means you can do it anytime, from the comfort of your home or office. This can save trips to the post office or waiting in line, which, in turn, saves time and potentially money, especially for businesses where time is a critical resource.

Customisation and Branding

Another advantage of creating your own labels is the ability to customise them. This is particularly beneficial for businesses, as it allows for branding opportunities. 

Customised labels can include your business logo, specific instructions, or personalised messages, which can enhance the customer experience.

To sum it up, whether it’s cheaper to make your custom label depends on the scale of your shipping needs, the resources you already have, and what you value in terms of convenience, and customisation.

For small-scale shippers or those looking for customisation, printing your own labels can be more cost-effective and flexible. 

However, for large-scale shippers, the time and resource investment might outweigh the cost benefits, making carrier-provided labels a more viable option.

Final Thoughts

Creating shipping labels is a crucial aspect of managing shipments efficiently, whether you’re an individual seller or a business. This guide has explored various methods, including software solutions, carrier platforms like FedEx, USPS, and UPS, and e-commerce platforms like PayPal, eBay, and Etsy. 

Each method offers unique benefits and caters to different shipping needs, ensuring that you can find a solution that best fits your requirements. By understanding these processes and utilising the right tools, you can streamline your shipping operations, save time, and potentially reduce costs, contributing to a more effective and satisfying shipping experience.

Now that you’ve learned how to create a shipping label, the next crucial step is printing them. To assist you in this process, we’ve prepared a dedicated guide on How to Print Shipping Labels. This resource will prove invaluable as you navigate the process of printing your shipping labels.

We hope this article was useful. 

Thanks for reading! 

Latest Articles

Learning Centres